Quick Start Guide
Version 2.0
Note: It can take up to 15-20 minutes from the time you start the Azure Virtual Machine until the installation completes. Please provide the required time before performing the steps below.
DayOne configuration steps include:
- Creating an application in Azure (check out our videos 1 & 2)
- Basic configuration
- Optional - Creating a certificate that matches your server FQDN
- Optional - DayOne Writeback Agent Installation
- Securing DayOne
When logging in to the DayOne Virtual Machine for the first time, the following screen will appear:

Note: We have added an option to automatically create the Azure AD Application for you, unless you prefer following the detailed steps for configuring this manually, described later in this guide.
Fill in the relevant information in Server URL including a Global Admin User & Password and click "Create Azure Application".
Wait for the "Tenant" and "Application ID/Client ID" to be filled automatically and press OK.
Please refresh the page and sign-in using a Global Admin account credentials.
Once you've signed-in, press Accept in the following screen:

Once accepted, you will be signed in to the DayOne app, where you can add new admins, tenants and connectors.
Admins
1. You can add Administrators to manage or view DayOne settings:
- Click the "hamburger" menu button (Top-Left) and select Admins

2. Press the + sign and provide the following details:

· Global Admin: Administrators that will have Full permissions in DayOne
· Tenant Admin: Administrators that will manage only Connectors assigned to their tenant. They will also be able to view the DayOne dashboard page and logs (Permissions are applied at the tenant level; Tenant Admins will be able to manage only connectors where their tenant has been set as the synchronization source)
· View Only: Administrators that will only be able to view the DayOne dashboard and its logs
Certificate
optional - please read here if needed
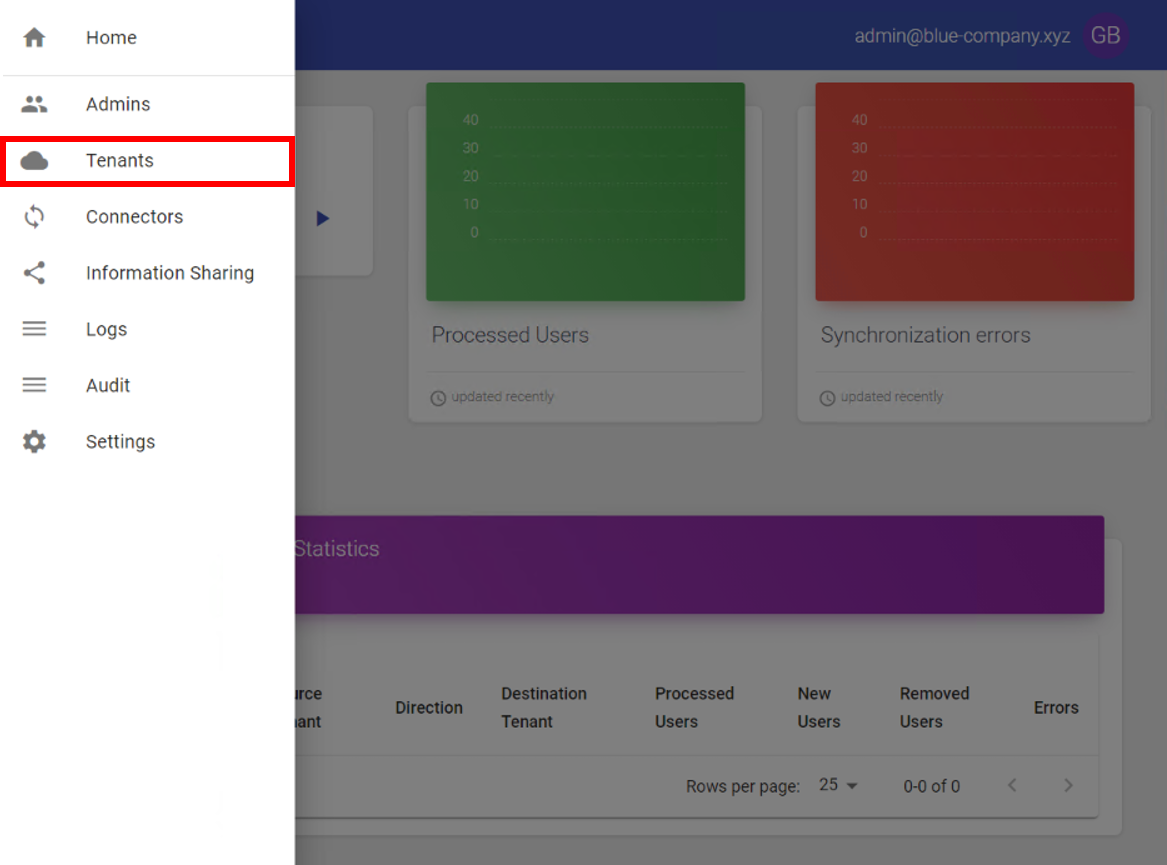
Tenants
1. Choose Tenants and configure the tenants you would like to sync objects (From and/or To).
You can watch the following video describing the steps.
2. Press the + sign.

3. Provide Organization Name & Tenant domain - and click "Create Azure Application / User"

4. Fill in the Username and Password and click the "CREATE" button.
For security reasons - if you don't have access to Global Admin credentials please follow up this guide and create Azure Tenant Application manually in your domain and continue to step
- Make sure the user account provided does not have MFA enabled.

Once you've entered the details - you should get this message:
- Please copy the User & Password details (you could use the copy button we've created for you).

5. Click the "ASSIGN USER" button and wait until it completes.
6. Once complete - Click the "GRANT ADMIN CONSENT" button. In the Azure login page, please provide the Global Admin credentials you have used in the previous steps.
7. Click "CLOSE"
You should now see a page similar to the following:

8. Choose how would you like to see the users in the Global Address List - Please choose the option that fits you best.
(Don't forget to provide the Organization Name & Tenant domain).
9. Click "ADD" and you should see your new tenant, similar to the following screen:

You can edit or delete your tenant from DayOne using the buttons on the right.
If you want to grant access to specific admin to the specific tenant in DayOne - Click the tenant in the Tenants list.

Click the "+" button (under "Blue Company admins" for example, as shown in the above screen shot) and choose the admin you wish to add from the list.
Connectors
- Click on the "Connectors" option in DayOne menu

2. Click on the + button to add new connector

3. Once clicked on the + button this screen should appear on the screen, please choose the "source tenant" (sync objects from this tenant), "Destination tenant" (sync objects to this tenant).

Source Tenant – Sync users from this tenant
Destination Tenant – Sync users to this tenant
Active – Enable/Disable the sync operation for this connector
Sync Unlicensed Users – Sync users without any license inOffice365
Member[On] Guest[Off] – Whether synced users will be created as “Guests” or as “Members” in the target tenant
Deletion Enabled – Should users be deleted in the target tenant incase they are deleted in the source tenant (only users that were created by the connector will be deleted by it)
Deletion Threshold – If the number of users to be deleted are above this threshold no deletion will occur and a warning will be issued (0 is no limit)
Display Objects – Enable/Disable displayed synced users in the address books of the target tenant
Display Name – Should display name be synced as is or changed according to organization policy
Display Name Suffix – Will be added to all synced users in destination tenant
4. Each connector can have inclusions and exclusions of its own. You can import a list of emails into each of these settings using a text file that contains a single email address per line. Or be configured with Azure AD group as source, the group can be dynamic or assigned and you should configure the group object ID.

Exclusions – Users in this list will not be synced, if they have already been synced by this connector they will be deleted(if deletion is enabled and the number of objects to be deleted is within the threshold configured)
Inclusions – If this list contains users, only these will be synced, if this connector synced other users they will be deleted (if deletion is enabled and the number of objects to be deleted is within the threshold configured)
DayOne Writeback Agent Installation
DayOne Writeback Agent setup is found on the Settings page of DayOne portal
1. Create an Azure AD application for the DayOne Writeback agent.

2. Select Authentication

3. Please select “Access tokens” ,“ID tokens”

4. Select API permissions
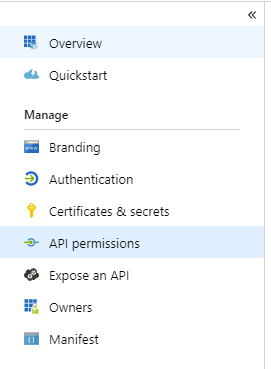
5. Select Add permissions

6. Select Microsoft Graph

7. Select Application permissions

8. Select User.Read.All

9. Select Grant admin consent for<YourAppName>

10. Select Certificates & secrets

11. Select New client secret

12. Enter description and select expiration

13. Copy the secret value

14. Create an Organizational Unit (OU) in Active Directory where mail-enabled user objects will be created by the agent and copy this OU’s distinguished Name
15. Exclude this Organizational Unit from Azure AD Connect Synchronization
16. Create an administrative account with the following permissions to in this OU: create + delete + modify user objects
17. Start the installation: “DayOne Writeback Agent Setup.msi”
18. In the Set Service Login write the credentials for the user created in step 23

19. Edit the service configuration file located in: "C:\Program Files (x86)\DayOne Write Back Service\DayOne WritebackAgent.exe.config"
20. Set the following parameters in the “DayOne Writeback Agent.exe.config” file:

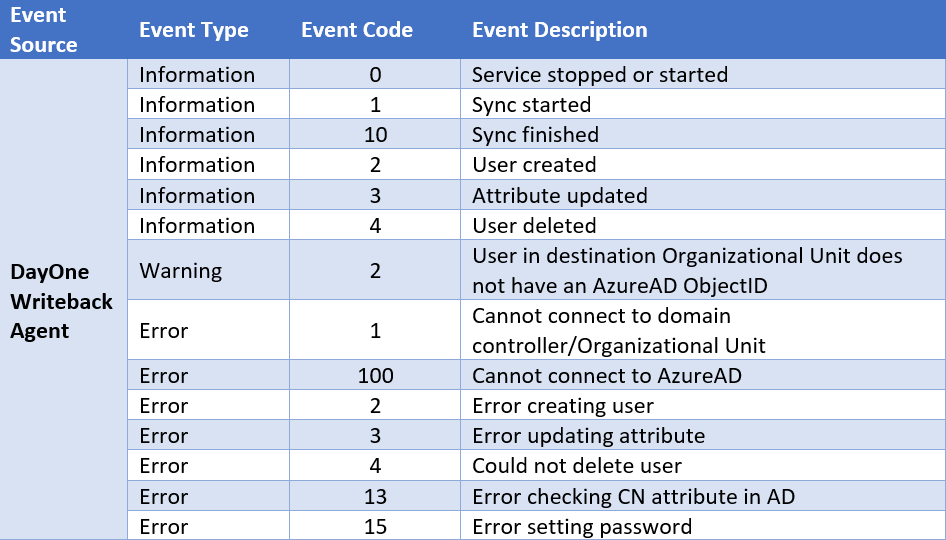
21. Following is a description of the DayOne Writeback Agent service events in Windows Event Viewer
Securing DayOne
1. To secure access to DayOne dashboard:
- Allow only your organization's IP addresses to connect using TCP port 443
- Configure your Admins to use MFA in Azure AD
2. To secure your tenant applications:
- Configure DayOne VM/Server with a static IP address
- Configure Azure AD conditional access that allows the Tenant Azure AD application and user to connect only from the static IP address assigned in the previous step
3. To secure the DayOne writeback agent application:
- Configure Azure AD conditional access that allows the DayOne writeback agent's Azure AD application to connect only from your organization external IP address
Creating an Azure AD Application for DayOne
1. Sign in to your Microsoft Azure account: Azure portal
2. Select Azure Active Directory

3. Select App registrations

4. Select New registration

5. Create a web application
- Enter https://<YourServerInFQDN>in the Redirect URI
- Choose Accounts in this organizational directory or Accounts in any organizational directory (to allow access to admins from other tenants)

6. Copy the Application ID from the Overview tab

7. Select Authentication

8. Under Advanced Settings please select “ID tokens”

9. Select API permissions

10. Select Grant admin consent

Define Tenants without Global Admin
Each tenant will require a user and an Azure AD Application.
- The user that will be configured in this section requires the following permissions:
In Exchange online:
Mail Recipients

- The application should be configured as follows:
· Register a new Azure AD application

· Copy the Application(client) ID

· Select Authentication

· Check ID tokens and click Save

· Select Certificates& secrets

· Select New client secret

· Choose expiration and select Add

· Copy the Client secret

· Select API permissions

· Select Add a permission

· Select Microsoft Graph

· Select Application permissions

· Add thefollowing permissions:
- Group.Read.All
- User.Invite.All
- User.ReadWrite.All

· Select Grant admin consent… and Yes

- Please provide the tenant and its user/application details (following is an example)

Contact Us
If you have any questions about this, please contact us:
By email: support@pro-vision.us